Helpful Hints and How-Tos for Removables
Helpful Hints And How-Tos for Removable Dental Restorations
Please find the below helpful hints and how to guides to assist your patient in getting the most accurate restoration possible. Additional how-to information can be found within its related product throughout our website.
Crown Under Existing Partial
When the patient has an existing partial and declines to provide the partial to our laboratory for crown/bridge fabrication, we can still fabricate the restoration to fit the partial by utilizing a partial index. See the provided step by step illustrated instructions for the creation of a partial index. Please notice that the images labeled Figure 8 through 11 will be fabricated within our laboratory. We also typically fabricate our matrixes using non-precious alloy instead of duralay, to prevent breakage during fabrication of the restoration.

Bite Stick for Setting the Occlusal Plane
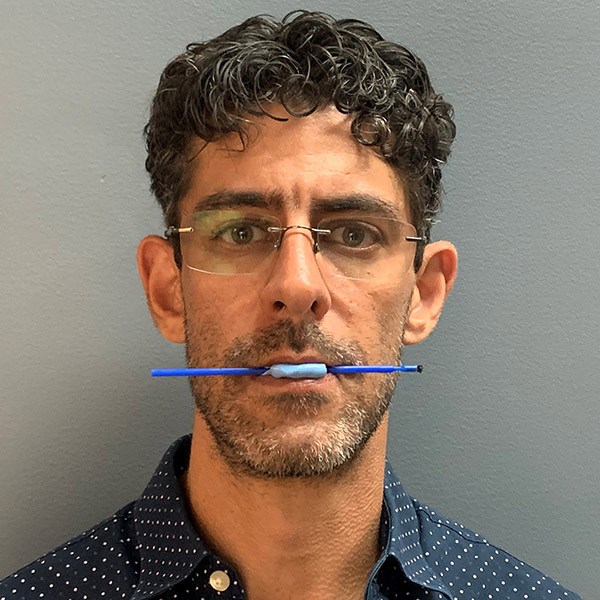
We recommend sending bite sticks for multi-unit anterior restorations, full arch crown & bridge restorations, and denture try-ins where the occlusal plane of the denture try-in needs modification. The stick bite is useful for both anatomic wax ups and fabrication of the final restorations. It ensures the restoration is made properly to the horizon and the patient’s eyes and face. To accomplish an accurate bite stick, syringe material is placed between the anterior dentition in the manner of a normal bite registration. Once the patient has closed properly into centric, excess syringe material is expressed on the buccal side of the dentition, baseplate + rim, or denture try in. While the syringe material is still wet, place the stick of your choice (disposable bonding brush, cotton top swab, etc.) into the excess material and align it to the horizon. After the stick is in the proper position, add more syringe material to cover it, which will provide extra stability.
Once in the laboratory, to mount the case using the bite stick, the bite stick is put in place between the models, just as it was in the mouth, and the models are arranged in the articulator so that both the left and right sides of the stick are the same distance from the table top (parallel to the table top). Once the models are mounted using the bite stick, we can now place the incisal edge position/ occlusal plane level to the horizon, regardless of the intraoral condition.
Taking a stick bite is quick and easy. The expense of the minimal time required for making this simple, but valuable tool is far outweighed by the value of preventing inaccurate wax-ups and final restorations.
Bite Stick Technique
- Find or create a reference to the horizon. Using a level, place a strip of tape on the back of a door, or use the top trim of a window or door, assuming it is level.
- Have the patient stand in front of the reference to the horizon.
- Inject syringe material between the anterior teeth and ensure it is enough to express onto the facial side when the patient closes.
- Have the patient close.
- Add more syringe material to the incisal 1/3 of the facial side of both upper and lower anteriors.
- Place your stick of choice into the syringe material and position it level to the horizon.
- Cover the stick with extra material for stability.
- Remove the bite stick from the mouth and send it to us with the other case materials.

What Type Of Smile Does Your Patient Desire?
When sending a diagnostic wax-up, fixed restoration which includes the upper anterior, or upper partial/denture case for which there is no existing dentition or restoration that the patient likes and wishes to duplicate, please utilize the LVI Smile Catalog. The LVI Smile Catalog allows the patient to choose from 12 distinctly different styles. Simply inform us on the Rx which style the patient desires and we will use it for fabrication of the prescribed product. Of course, changes can be made as necessary to fit the specific patient’s desires.
How To Capture The Same VD As An Existing Denture
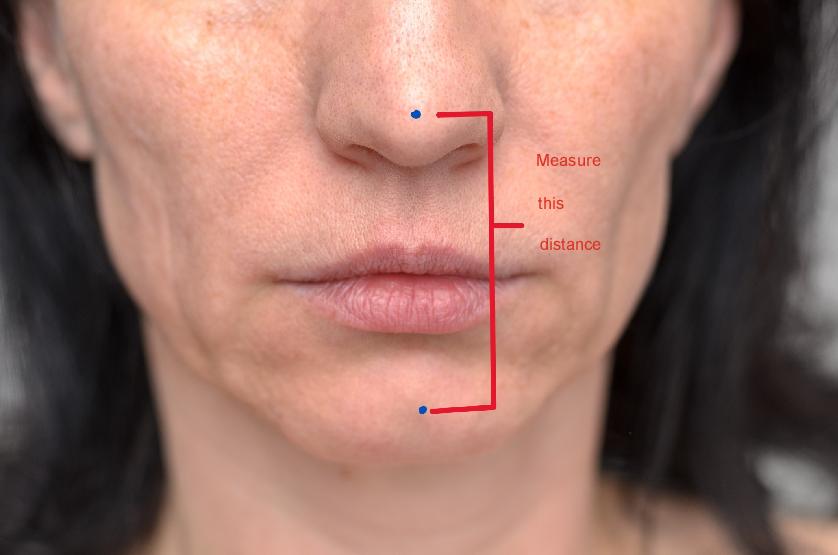
Are you making a new denture for your patient and want to match the Vertical Dimension (VD) of an existing denture? The VD of an existing denture cannot be replicated by providing a study model to the laboratory. To accurately capture the VD of an existing denture for the new denture, you can use one of two methods. If the patient is willing to go without the existing denture, treat the existing denture as a custom tray and take a wash impression inside the denture. When you take the wash impression, use medium or light body, or a combination of both, and be sure the wash is not too thick, thus raising the VD and affecting the occlusal relationship. While the wash impression is setting up, have the patient close down so you can visually confirm the occlusal relationship of the denture is not impacted by the wash impression. From there, take a left and right side bite registration and we will pour the new model from the wash impression and set the VD with the existing denture. If you have a baseplate + rim and will not be sending us the existing denture, you can still set the VD to be the same as the existing denture. With the old denture in the mouth, make an ink dot on the patient’s nose and chin. Measure the distance between the dots. Remove the existing denture and insert the baseplate + rim. Measure the distance between the dots. If the measurement is more than the measurement of the existing denture, take a blade and cut down the occlusal plane of the rim until the distance between the dots measures the same. You may want to adjust the rim slightly more to allow for the thickness of the syringe bite registration material. When you express the syringe material, take another measurement to ensure it is as needed. If the measurement with the baseplate + rim is less than the existing VD, you can add to the occlusal plane of the rim with wax, or using syringe material until the desired VD is reached. Your denture tooth try in will now have the same VD as the existing denture! If the denture is on the maxillary, don’t forget to carve the smile line into the buccal side of the rim so we can place the gumline accordingly. And, if the midline is not the same location as the incisive papilla, carve the midline on the rim as well.